
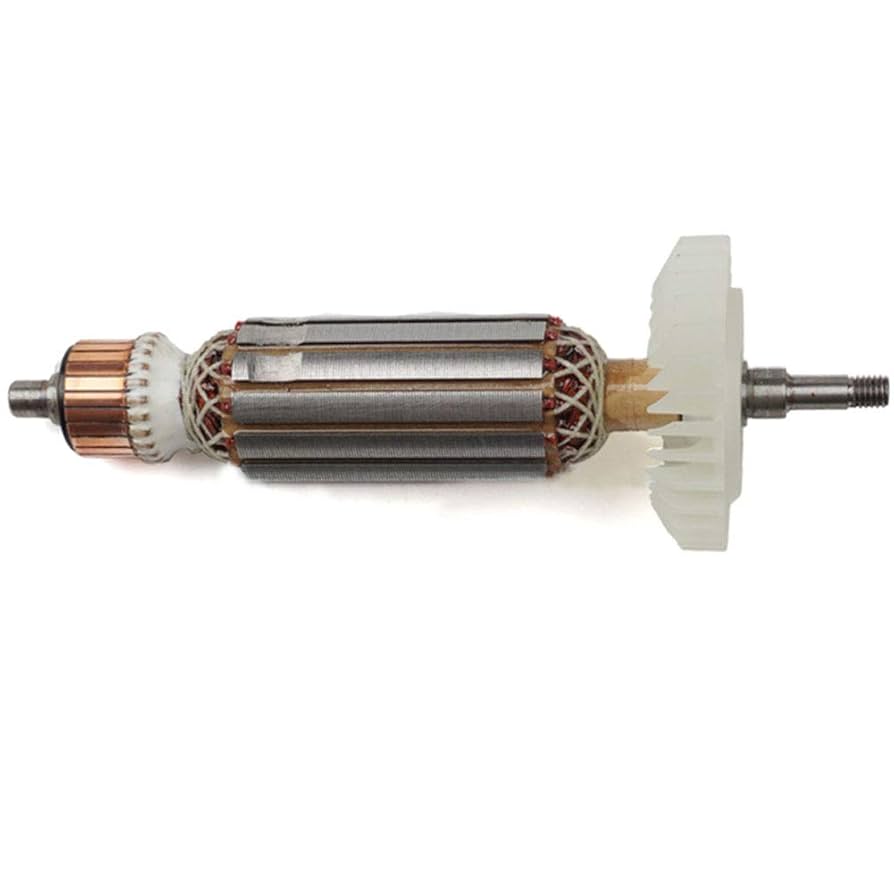
Makita 9564cv Grinder PartsMakita 9564cv Replacement ArmatureThe 9564CV grinder happens to be one of the most popular grinders on the market. Its a good grinder, your smart to have one. But it’s not bullet proof. Your grinding away on a project, as usual you’re behind schedule but well on your way towards making progress and finishing your project. Then suddenly your ever faithful Makita grinder starts making an electrical popping noise. To make matters worse, you notice a sudden loss of power and it starts running a bit rough. You think to yourself, “I’m almost done if I can just push through this last little bit I’ll see what I can do for my grinder.” Then it happens – sparks start shooting out of your grinder air vents and with one last sputter it just stops. The disappointing idea of your project being pushed out another day is further tainted with the prospect of having to lay out a wad of cash for a new angle grinder.If you spend a regular amount of time working with hand held electrical tools odds are if this situation hasn’t happened yet, its only a matter of time before it does. Although we can’t totally remove the pain your wallet feels after a total breakdown of a tool, we can definitely soften the blow. The next time your tool acts up, before just giving in and buying a new one, consider repairing the old guy and breathing new life into your old friend. Thats right, inexpensive parts are available for most of the power tools you have in your shop and repairing your tools can save you a ton of cash.
Faulty Armature Symptoms
Difficult start-ups
Shut-offs during use
Visible discoloration, damage, warping or chipping
Examples of what a bad armature looks like:
Burned up Commutator: This is one of the most common armature malfunctions. This is also one of the most deceptive symptoms. Believe it or not just because the commutator my look bad doesn’t necessarily mean it is malfunctioning. If this is the only part that looks bad on your armature, I would strongly suggest you try a new set of brushes before you change out your armature.
Examples of what a bad armature looks like:
Burned up Commutator: This is one of the most common armature malfunctions. This is also one of the most deceptive symptoms. Believe it or not just because the commutator my look bad doesn’t necessarily mean it is malfunctioning. If this is the only part that looks bad on your armature, I would strongly suggest you try a new set of brushes before you change out your armature.
Damaged Coil Winding: Notice how only one band of the coil is burned up. If you see this, you should replace your armature.
Burned Up Coil: Notice how the armature is much darker than usual. This is a pretty strong cue that it is burned up. This armature would have to be replaced.
Replacing Armature Instructions
Get the right armatureOrder online:
Makita 515226-6
Unscrew the screws located in the back of your grinder right next to the power cord.
Separate black rear cover from blue motor housing
Remove Brushes: The brushes are located at the back end of the blue motor housing. (There will be two, one on either side) Simply pull off the brush leads and slide the brushes up and out of the brush holder.Inspect Brushes: If worn you may want to replace themOrder online: 9564cv Brushes
Unscrew the four screws connecting the gear housing to the gear housing cover.
Separate the housing from the cover.
Pry Apart: There will be a small slot on one side of the motor housing, with a screwdriver separate the gear housing cover from the motor housing.
Separate: Pull the gear housing plate from the motor housing.
Inspect Armature: At this point you will be able to fully inspect your armature. Notice the comparison of the new armature against the old armature. The old armature is pitted and worn down. You will also notice that the plastic insulation washer is worn down.
Wipe Off Grease: There will be plenty of grease on the spiral bevel gear, unless you don’t mind your wife giving you the “stink eye” because of the grease all over your shirt, you better clean it off.
Remove Stop Spring: Now flip your armature over and remove the stop spring thats holding the magnet sleeve in place. A dentists pick works great for this. Be sure to place stop spring in a special location so that you don’t lose it.
Remove Magnet Sleeve: With your stop spring removed simply pull off the magnet sleeve and the washer directly under it.
Armature in Vice: Now lightly clamp your armature into a bench vice. In the picture you’ll notice we have brass plates in the vice jaws to protect the armature. Two thin strips of wood would work just as good.
Now remove the hex nut and washer
Pry Off Gear: Now place the spiral bevel gear and stop spring sideways into your vice. Again make sure you are using either a soft metal like brass or some strips of wood to protect the parts of your armature against the jaws of your vice.
Separate Gear from Armature: Now that the gear and stop spring have been pried loose, you will be able to easily separate them from your armature.
Remove the lock spring from bearing. Make sure to put it in a safe spot, these are easy to lose.
Separating Armature From Gear Plate: In order to remove the armature from the gear housing plate you will need to lightly tap at the end of the armature with a plastic deadblow hammer. Protect your threads by replacing the hex nut.
Tap Out Armature: Adjust your vice jaws so that you can loosely place your armature within the vice with the back of the gear housing plate resting on top of the jaws. Once this is done you will be able to lightly tap at the armature with a plastic deadblow hammer.
Now flip your gear housing cover over and place back on top of the vice jaws.
Now insert your new 9564cv Grinder Armature.
Seat Bearing: Making sure your bearing is in place, tighten up your vice jaws to allow just enough room for the armature threads to loosely fit within the jaws and with the bearing sitting on top of the jaws.
With your armature sitting on top of the vice, lightly tap the top of the armature to seat the bearing.
Replace Retaining Ring: Now that the armature bearing has been seated, replace the retaining ring.
Slip on the stop spring and the spiral bevel gear
Place over cracked open vice jaws
Tap Home: With the armature resting on the vice jaws, lightly tap home the stop spring and bevel gear.
Now simply replace the washer and hex nut.
Rubber Ring: If the Labyrinth rubber ring wasn’t attached to the exposed bearing when you removed your old armature, it will be inside your grinder motor housing. You will be able to remove it with something like a dentists pick. It will be located within the motor housing in the spot illustrated in the diagram.
Simply place the rubber ring over the exposed armature bearing.
Insert Baffle Plate: Align the baffle plate guide posts with the proper guide slots within your grinder motor housing and insert the baffle plate.
Tap Home Armature: Now insert your new armature into the motor housing. It should be able to be properly seated with a few light taps. If its resisting your light taps, remove the armature and make sure your rubber ring is in proper position. Try again, if it’s still not slipping into place you may have a distorted motor housing from overheating. This also should be replaced if that is the problemIf Needed:
Makita 9564cv Motor Housing
Replace Gear Housing: Now replace your gear housing and tighten down the screws.
Replace Your Brushes: Don’t forget to re-insert your brushes. Be sure the brush retaining spring is clipped over your brush.
Replace Rear Cover: Also replace your rear cover and tighten down those screws.
Posted in Grinders, Makita Tool Repair, Tool Info, Tools and tagged with replace 9564cv armature, Repair Makita 9564cv armature, repair 9564cv grinder, repair 9564cv armature, Makita 9564cv parts, Makita 9564cv grinder repair, Makita 515226-6, 9564cv grinder amrature, 9564cv armature by admin.


Leave a Comment